
Knots and Other Skills
Apr 06, 2023Knots, chopping wood and pull-ups are the focus of this skills article because modern men spend a lot of their time fiddling with their computers or tinkering with their cars, but they’ve lost a lot of the skills that made us… well… useful!
There may come a time when you’ll need to “get back to the basics” of those skills required to survive in an emergency situation. Below are a few simple skills that will help you to cope with anything life can throw at you:
Chop Wood
With all the modern appliances—heaters, gas grills, electric and gas stoves, water heaters, etc.—there’s really no need for you to chop wood. Sure, your home may have a wood-burning fireplace, but you can always buy your wood already chopped, right?
Well, think about what would happen if all the modern conveniences were no longer available. Perhaps there’s a problem with a local power company and all your heat gets shut off in the middle of winter. Or you get trapped in a cabin on the mountains with no electricity or modern heating. How are you going to stay warm then?
By chopping wood, of course!
Not only is chopping wood a valuable survival skill, it’s also one of those uber-manly skills you need to know how to do in order to keep your “man card”. Don’t worry—it’s not as difficult as you might think!
Wood-Chopping 101
Here is the step-by-step guide to chopping wood like a man:
Step 1: Know your tools. An axe is used for chopping wood into smaller pieces, but for big logs you’re going to need a maul (axe blade with a heavy sledgehammer head) or a splitting wedge (a wedge you pound into the log using a sledgehammer). You’ll also want a broad, sturdy log to set your smaller logs on—it makes for a safe, stable surface for chopping wood.
Step 2: Get set up. Place the log you want to split on your chopping block. Set it up so it will stand without your needing to hold it, and with the grain (lines) facing you. Avoid wood that has nails or knots, or that is too curvy to chop easily. Seasoned wood is easier to split than green wood.
Step 3: Swing the axe like a boss. Stand with your legs spread slightly. Lift the axe up and over your head before swinging it straight down. The goal is to bury the axe blade into the center of the log. Let speed and the weight of the axe do most of the work—don’t use brute strength. Don’t worry if you don’t hit the log the same place every time.
Step 4: Split the wood. If the log isn’t too thick, you should be able to split it in half on the first swing. However, thicker logs require more swings. If the axe head is buried in the log, lift axe and log and slam them back onto the chopping block. The impact will drive the axe head deeper into the log and split it further. Do this a few times and the wood should finish splitting.
Wood-Chopping Tips
Here are a few tips that will make your wood-chopping a bit easier:
- Let the tool do the work. The weight of the axe or maul should be more than enough to split the log. You don’t need to drive it down with all your strength.
- Maintain a proper posture: arch your back, bend your legs, and feel the movement in your leg muscles. Proper posture will save your back!
- Hit on the opposite side. You may be tempted to strike the log on the near edge, but try to hit it on the farther side of the center. It’s safer and will increase the chance of a one-hit split.
- Wrap a bungee cord around a thick log. This will hold the pieces in place, keeping the log steady as you split it into smaller pieces.
- Keep your axe sharp. A sharp axe blade makes chopping wood a whole lot easier!
Follow this advice, and you’ll always have freshly chopped wood for your fireplace.
Tying Knots
Knots are INCREDIBLY handy, and not just for sailors and Boy Scouts. You’ll find yourself in a wide variety of situations where you need to know how to tie more than just the basic knot. Knowing a few of the more complex knots can be very useful while camping, hiking, traveling, fixing your home, organizing your garage, and the list goes on!
Here are a few of the knots you MUST know:
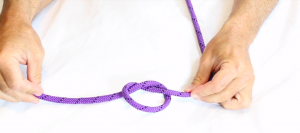
Overhand Knots – Everyone knows this one! Form a loop in the rope and pass the end through. Pull tight and you have your overhand knot.
Sheet Bend Knots – Also known as the “Weaver’s Knot”, this is a very useful knot for tying the 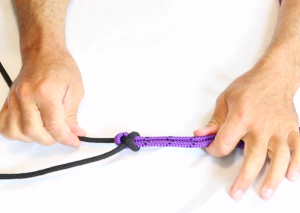
ends of two ropes together. Bend the end of one rope (forming a bight) and pass the end of the other rope through the bight. Run the second rope around and behind the first rope, then pass it through the loop it has created. Pull tight for a perfect Sheet Bend Knot.
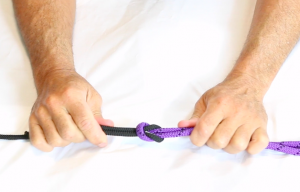
Square Knot – Also known as a “Reef Knot”, this is another great knot for joining two lengths of rope. Cross the two ends of the rope over each other to make a loose half-knot, then tie them together in a basic Overhand Knot. Pull it tight to form a proper Square Knot.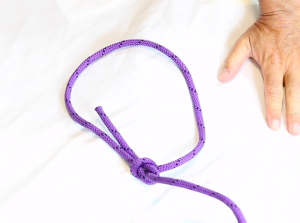
Bowline Knot – This is where things get a bit more complex, but a Bowline Knot is both highly secure and easy to untie. Hold the rope in your left hand and form a small loop in the line. Pull the free end of the rope through the eye of the loop, wrap it around the rope in your left hand, and back down through the loop. Pull on the free end to make a tight Bowline Knot.
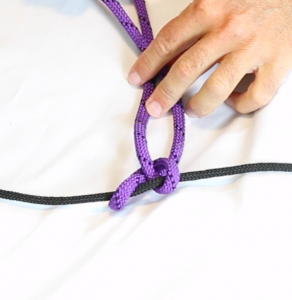
Clove Hitch – A Clove Hitch is a knot that is useful for anchoring a rope to something solid, like a pillar or tree branch. Wrap the free end of the rope around the pole, pass it over the standing rope, and wrap it around the pillar again (above the standing rope). Thread the end through that last loop and pull tight to make a beautiful Clove Hitch. This knot won’t loosen no matter how hard you pull on the standing rope.
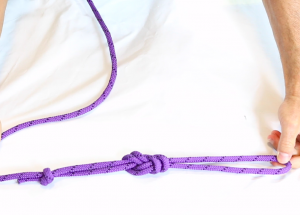
Figure 8 Knot – Also known as the “Flemish Knot”, this is a great way to secure another knot or stop the rope from slipping through a pulley. Bend the rope and pass the tail over the standing rope, then again underneath and around, Slip the tail end through the first loop and pull tight. You now have a Figure 8 Knot.
These are the knots you’ll find handy in almost any situation you encounter, but there are DOZENS more you can learn (everything from the Slip Knot to the Noose to the Half-Hitch to the Girth Hitch).
Want to study more about tying knots?
Check out this video instructional i put together for you on these knots.
See the step-by-step guide to tying basic knots
Do A Pull-Up
There are few exercises more synonymous with “masculinity” and “fitness” than pull-ups. It takes a lot of arm, shoulder, and back strength to be able to lift your body weight. You’ll find that this skill will come in handy A LOT more often than you’d think—from rock climbing to parkour to home repairs to a zombie apocalypse!
I’ve put together a complete video on how to do a perfect pull-up every time. In just THREE minutes, you can learn everything there is to know about mastering the Pull-Up:
The beauty of the Pull-Up is that it works every “pulling” muscle in your upper body: your forearms, biceps, shoulders, and upper back. Add in the tight core, and you’ve got an amazing upper body workout.
What If I Can’t Do a Pull-Up Yet?
Yes, it’s very likely that you will have a hard time doing more than a pull-up or two at first. Don’t sweat it! As I said above, pull-ups are a hardcore move that requires a surprising amount of upper body strength. Thankfully, there are a lot of things you can do to work toward mastering the pull-up:
Strengthen the Pulling Muscles – Your upper body pulling muscles (shoulders, arms, and upper back) may not yet be strong enough to do proper pull-ups, but you should spend time strengthening them. That means a lot of Lat Pull-Downs and variations on Bicep Curls. Strengthen your pulling muscles and you’ll have an easier time performing the pulling exercise.
Do Assisted Pull-Ups – Using a bench or a partner to help you do pull-ups is a great way to get started. Your muscles will still do most of the work, but you’ll have a bit of help to get you “over the hump”. Support as little of your weight as possible so you can get stronger with every training session.
Switch Grips – Pull-Ups can be tough, but Chin-Ups are a bit easier. Instead of gripping the bar with your palms facing away from you, switch the grip so your palms are facing toward you. This reverse grip will allow your arms to do more of the work and make the exercise a bit less challenging.
Perform Negative Pull-Ups – This exercise focuses on the “eccentric” (lengthening) portion of the movement rather than the “concentric” (shortening/tightening) portion. Jump up to your hands and slowly lower yourself down, keeping your descent controlled. It will hit the muscles from a different angle and lead to better overall strength.
Use Resistance Bands – Resistance bands can offer the assistance you need to get started with the Pull-Up. Run a band around the Pull-Up bar and under your knees/feet. The tension will increase the lower you go, making it easier for you to pull back up toward your hands.
Do Them Regularly – The more you perform pull-ups, the easier they’ll become. Spend a few minutes every other day training your pulling muscles. Even if you just do a set or two of pull-ups, it will help you to build strength. Hit your upper back hard on Back Day for quicker results!
Strengthen Your Grip – Your forearms will do a lot of the work in the pull-up. Spend time strengthening your grip by performing Farmer’s Walks or Dead Hangs. A stronger grip will make it easier for you to pull up toward the bar.
These three skills will come in very handy at different times in your life. You’ll find that mastering them will make you a better and more confident.
If you are interested in some of the other skills you should learn you can read about them in this article.

